Monday 12 November 2012

Generating a list of items with/without major versions

Recently I blogged about using PowerShell to generate a report of the value of a metadata field of items from SharePoint lists that had the metadata field (here).

I just modified this script so that it creates a report of all items with/without major versions, for lists that support minor versions.

Here it is:

function Audit-Webs($SiteUrl,$CheckSubWebs)
{
$items = New-Object psobject
$items | Add-Member -MemberType NoteProperty -Name "Title" -value ""
$items | Add-Member -MemberType NoteProperty -Name "HasMajorVersion" -value ""
$items | Add-Member -MemberType NoteProperty -Name "ListTitle" -value ""
$items | Add-Member -MemberType NoteProperty -Name "Web" -value ""
$a = $null
$a = @()
$w = get-spweb $SiteUrl
$lc = $w.Lists;
foreach($l in $lc){
if($l.Title -eq "Relationships List"){continue;}
if($l.Hidden -eq $true){continue;}
if($l.EnableMinorVersions -eq $true){
$listitems = $l.Items
foreach($i in $listitems){
$b = $items | Select-Object *;
$b.ListTitle=$l.Title;
$b.Web=$w.Title;
if([String]::IsNullOrEmpty($i["Title"])){$b.Title = "";}
else{$b.Title = $i["Title"];}
if($i.HasPublishedVersion){$b.HasMajorVersion = $true;}
else{
$b.HasMajorVersion = $false;}
$a+=$b
}
}
}
if($CheckSubWebs)
{
if($w.Webs.Count -gt 0)
{
foreach($sw in $w.Webs)
{
$a += Audit-Webs -SiteUrl $sw.Url -CheckSubWebs $true
}
}
}
$w.Dispose();
Write-Output $a
}
$a = $null
$a = @()
$a = Audit-Webs -SiteUrl "http://my" -CheckSubWebs $true
$a | Where-Object {$_} | Export-Csv -Delimiter "," -Path C:\export.csv -notype 

Thursday 8 November 2012

Export list item metadata to a CSV file using PowerShell

I recently wrote a bit of a script for someone on a forum that exports certain listitem metadata to a CSV file. I thought I'd share it here:

The basic idea is the script needs to check all the lists of a certain type in a web and it's sub webs, and check whether a certain metadata field had been filled in (or not), and then export the results to a CSV file.

The script has a method that's called recursively, adding the results to a custom psobject. It then uses Export-Csv commandlet to export the results to a CSV file... easy!

The results look like this:


Here's the code (which could probably do with being "elegantised"):

function Audit-Webs($SiteUrl,$CheckSubWebs) 
{ 
$items = New-Object psobject 
$items | Add-Member -MemberType NoteProperty -Name "Title" -value "" ;
$items | Add-Member -MemberType NoteProperty -Name "Field" -value "" ;
$items | Add-Member -MemberType NoteProperty -Name "FieldValue" -value "" ;
$items | Add-Member -MemberType NoteProperty -Name "ListTitle" -value ""; 
$items | Add-Member -MemberType NoteProperty -Name "Web" -value "" ;
$a = $null $a = @(); 
$w = get-spweb $SiteUrl ;
$lc = $w.Lists; 
foreach($l in $lc){ 
if($l.Hidden -eq $true){continue;} 
if($l.BaseTemplate -eq 100 -and $l.Title -eq "peopleHighlight"){ 
$listitems = $l.Items;
foreach($i in $listitems){ 
$b = $items | Select-Object *; 
$b.ListTitle=$l.Title; 
$b.Web=$w.Title; 
$b.Field = "Order0"; 
if([String]::IsNullOrEmpty($i["Title"])){$b.Title = "";}
else{$b.Title = $i["Title"];} 
if([String]::IsNullOrEmpty($i["Order0"])){$b.FieldValue = $false;} 
else{ $b.FieldValue = $true;}
$a+=$b
}
}
} 
if($CheckSubWebs) { 
if($w.Webs.Count -gt 0) {
foreach($sw in $w.Webs) {
$a += Audit-Webs -SiteUrl $sw.Url -CheckSubWebs $true 
} 
} 
} 
$w.Dispose(); 
Write-Output $a 
} 

$a = $null;
$a = @();
$a = Audit-Webs -SiteUrl "http://mywebsite" -CheckSubWebs $true $a 
| Where-Object {$_} | Export-Csv -Delimiter "," -Path C:\export1.csv -notype  

Tuesday 6 November 2012

Delete document or list item versions using PowerShell

If you want... you can easily delete (or prune) the versions of list items or documents in a SharePoint list / library using PowerShell

Example: Prune the versions of all items in a list to a maximum of 20

$w = get-spweb http://myweb;
$l = $w.Lists["My List"];
$items = $l.Items;
foreach($item in $i){
if($item.Versions.Count -gt 20){
$vtr = $item.Versions.Count;
while($vtr -gt 20){
$vtr--;$item.Versions[$vtr].Delete()
}}} 

Friday 26 October 2012

Change the content type of list items using PowerShell

If you've got a content type deployed in multiple lists in site, and you want a way to quickly change all the existing items to the new content type, you can use PowerShell to do the dirty work.

Note that there are a few caveats to this:
1. The default content type of the list isn't being changed by the script
2. If you change the content type of items, and the new content type has new fields that are require fields, users will be prompted to enter information into the required fields next time they edit the item.
3. You need to add the new content type to each list that will be updated, before running this script

Firstly, if you want to understand how many items are going to be updated, run this script, which will report the number of list items to be updated for each list.

List items that need changing:

$oldCtName = "theNewContentTypesName";
$newCtName = "theOldContentTypesName";
$w = get-spweb http://my;
$a = $null;
$a = @();
$lc = $w.Lists;
foreach($l in $lc){
$lT = $l.Title;
if($l.ContentTypesEnabled -eq $false){continue;}
if($l.IsContentTypeAllowed($contenttype) -eq $false){continue;}
$cT = $l.ContentTypes[$newCtName];
if($cT -eq $null){continue;}
$ic = 0;
$listitems = $l.Items;
$listname = $l.Title;
Write-Host "Found Content Type:"$cT.Name"on list $listname";
foreach($i in $listitems){
if($i["Content Type"] -eq $oldCtName){$ic++;}
};
if($ic -gt 0){
$a += ("List $listname has $ic items which have been updated with the new content type.")
};
}
$a


To update the content type for each list item (in each list in the web that has your new content type added to it), use the following script:

Change Content Type

$oldCtName = "theNewContentTypesName";
$newCtName = "theOldContentTypesName";
$w = get-spweb http://my;
$CtypeId = [Guid]("{03e45e84-1992-4d42-9116-26f756012634}") #SPBuiltInFieldId.ContentTypeId
$a = $null;
$a = @();
$lc = $w.Lists;
foreach($l in $lc){
$lT = $l.Title
if($l.ContentTypesEnabled -eq $false){
Write-Host "Content Types are not enabled on the $lT list";
continue;
}
if($l.IsContentTypeAllowed($contenttype) -eq $false){
Write-Host "Content Type not allow on the $lT list";
continue;
}
$cT = $l.ContentTypes[$newCtName];
if($cT -eq $null){
Write-Host "Content Type has not been added to this list. Skipping to the next list.";
continue;
}
Write-Host "Found Content Type:"$cT.Name;
$ic = 0;
$listitems = $l.Items
$listname = $l.Title;
foreach($i in $listitems){
if($i["Content Type"] -eq $oldCtName){
$i[$CtypeId] = $cT.Id;$i.SystemUpdate();$ic++;
}
};
if($ic -gt 0){
$a += ("List $listname has $ic items which have been updated with the new content type.")
};
}
$a

Thursday 25 October 2012

Getting a little more from SharePoints Web Analytics

I did this ages ago, but I thought I blog about it now, in case it helps someone.

SharePoint has a built-in web analytics webpart. It provides some interesting info out of the box, but I wanted a tailored version that would display the top pages based on the users department, and cache it, without the user having to select any options.

I developed a webpart, that uses the same SQL function SharePoint does to query SharePoint's analytics database, returning the most popular pages being accessed by people in the same department (I used SQL Analyzer to find out the function SharePoint was using).

The function, fn_WA_GetClickthroughChanges, takes 8 inputs, of which I'm supplying 6, and using the default for the other two, indicated by *:

The current date as an Int (todays date minus the number of days you want to trend over. I.e. -30)
The previous date as an Int (the "current date", as defined above, minus the number of days you want to trend over)
The number of days to trend across
The site id
A bit value that indicates whether to include sub sites
The content type (default is null)*
The users title (default is null)*
The users department

The webpart queries the database for the most accessed pages based on the current users department, gets the page title (and does some optional formating depending on the page name), and caches the output.

You can download the wsp/source code here:

Source code and WSP file

It looks like this:


The code looks like this:

private const string GetRecentTrend = "SELECT TOP (200) * FROM [dbo].[fn_WA_GetClickthroughChanges]({0}, {1}, {2}, '{3}', {4}, default, default, {5})  ORDER BY [CurrentFrequency] DESC";
private string GetMostPopularLinks()
{
 var cacheObjectName = String.Format("inceMostPopular{0}", GetUsersDepartment());
 var cachedOutput = HttpRuntime.Cache[cacheObjectName];
 if (cachedOutput != null)
 {
  return (String)cachedOutput;
 }

 SqlConnectionStringBuilder cs = new SqlConnectionStringBuilder();
 cs.UserID = SpAnalyticsSqlUser;
 cs.Password = SpAnalyticsSqlUserPassword;
 cs.DataSource = SpAnalyticsSqlServer;
 cs.InitialCatalog = SpAnalyticsSqlServerDatabase;
 SqlConnection conn = new SqlConnection(cs.ConnectionString);
 StringBuilder im = new StringBuilder();
 im.Append("<ul id=\"inceMPList\">");
 im.Append(String.Format("<li id=\"inceMPListFirstItem\">{0}</li>", Title));

 try
 {
  conn.Open();
  Int32 lastNumberOfDays = NumberOfDaysToLookBack;
  String siteId = SubstituteWebId == String.Empty ? SPContext.Current.Site.ID.ToString() : SubstituteWebId;
  String department = GetUsersDepartment();
  DateTime currentDate = DateTime.Now.AddDays(-lastNumberOfDays);
  DateTime previousDate = currentDate.AddDays(-lastNumberOfDays);
  Int32 currentDateAsInt = Int32.Parse(String.Format("{0}{1}{2}", currentDate.Year, currentDate.Month.ToString().PadLeft(2, '0'), currentDate.Day.ToString().PadLeft(2, '0')));
  Int32 previousDateAsInt = Int32.Parse(String.Format("{0}{1}{2}", previousDate.Year, previousDate.Month.ToString().PadLeft(2, '0'), previousDate.Day.ToString().PadLeft(2, '0')));

  SqlCommand command = new SqlCommand();
  command = department != String.Empty ? new SqlCommand(String.Format(GetRecentTrend, currentDateAsInt, previousDateAsInt, lastNumberOfDays, siteId, 1, String.Format("'{0}'", department)), conn) : new SqlCommand(String.Format(GetRecentTrend, currentDateAsInt, previousDateAsInt, lastNumberOfDays, siteId, 1, "default"), conn);

  command.CommandType = CommandType.Text;
  var dr = command.ExecuteReader();
  if (dr != null)
  {
   if (dr.HasRows)
   {
    String trendup = "<img src=\"/_layouts/images/ince/isqtrendup.png\" alt=\"trend up\"/>";
    String trenddown = "<img src=\"/_layouts/images/ince/isqtrenddown.png\" alt=\"trend up\"/>";
    Int32 currentRank = 1;
    Int32 rowCount = 0;
    Int32 maxCout = MaximumItemsToDisplay;

    while (dr.Read())
    {
     String pageId = dr["PageId"] == DBNull.Value ? String.Empty : (String)dr["PageId"];
     //|| pageId.ToLower().Contains("/lists/") || pageId.ToLower().Contains("/forms/")
     if (pageId.ToLower().EndsWith("home.aspx") || pageId.ToLower().EndsWith("default.aspx") || pageId.ToLower().Contains("_layouts") || pageId.ToLower().Contains("/searchcenter/"))
     {
      currentRank++;
      continue;
     }

     var oCurrentFrequency = dr["CurrentFrequency"];
     var oPreviousRank = dr["PreviousRank"];

     Int64 currentFrequency = oCurrentFrequency == DBNull.Value ? 0 : (Int64)oCurrentFrequency;
     Int64 previousRank = oPreviousRank == DBNull.Value ? 0 : (Int64)oPreviousRank;
     String pageName = GetPageTitle(pageId);

     if(currentRank > previousRank)
     {
      im.Append(String.Format("<li class=\"inceMPItem\"><a href=\"{0}\" alt=\"{1}\">{1}{2}</a></li>", pageId, String.Format("{0} ({1})", pageName, currentFrequency), trendup));  
     }
     if (currentRank == previousRank)
     {
      im.Append(String.Format("<li class=\"inceMPItem\"><a href=\"{0}\" alt=\"{1}\">{1}</a></li>", pageId, String.Format("{0} ({1})", pageName, currentFrequency)));
     }
     if (currentRank < previousRank)
     {
      im.Append(String.Format("<li class=\"inceMPItem\"><a href=\"{0}\" alt=\"{1}\">{1}{2}</a></li>", pageId, String.Format("{0} ({1})", pageName, currentFrequency), trenddown));
     }
     currentRank++;
     rowCount++;
     if(rowCount == maxCout)
     {
      break;
     }
    }
   }
   else
   {
    im.Append(String.Format("<li class=\"inceMPItem\"><span>No Results</span></li>"));
   }
   dr.Close();
  }
 }
 catch (Exception exception)
 {
  return String.Format("[GetMostPopularLinks] Unhandled Exception retrieving most popular links. Error: {0}",exception.Message);
 }
 finally
 {
  conn.Close();
 }
 im.Append("</ul>");
 HttpRuntime.Cache.Insert(cacheObjectName, im.ToString(), null, DateTime.UtcNow.AddMinutes(MinutesToCacheLookup), Cache.NoSlidingExpiration);
 return im.ToString();
}

private string GetPageTitle(string pageId)
{
 bool originalCatchValue = SPSecurity.CatchAccessDeniedException;
 SPSecurity.CatchAccessDeniedException = false;
 try
 {
  if(SubstituteWebHostHeader != String.Empty)
  {
   var currentWebHh = pageId.Substring(pageId.IndexOf("//")+2);
   currentWebHh = currentWebHh.Substring(0, currentWebHh.IndexOf("/"));
   pageId = pageId.Replace(currentWebHh, SubstituteWebHostHeader);  
  }
  using (SPSite spSite = new SPSite(SPContext.Current.Site.Url))
  {
   using (SPWeb spWeb = spSite.OpenWeb(pageId))
   {
    if (pageId.ToLower().Contains("/forms/") || pageId.ToLower().Contains("/lists/"))
    {
     if(pageId.ToLower().Contains("/lists/"))
     {
      var firstPart = pageId.Substring(0, pageId.ToLower().LastIndexOf("/"));
      firstPart = firstPart.ToLower().Replace("/lists/", "/");
      firstPart = firstPart.Substring(spSite.Url.Length);
      return firstPart;
     }
     if (pageId.ToLower().Contains("/forms/"))
     {
      var firstPart = pageId.Substring(0, pageId.ToLower().LastIndexOf("/"));
      firstPart = firstPart.ToLower().Replace("/forms", "/");
      firstPart = firstPart.Substring(spSite.Url.Length);
      return firstPart;
     }
    }
    var item = spWeb.GetListItem(pageId);
    if (item != null)
    {
     return item.Title == String.Empty ? pageId.Substring(pageId.LastIndexOf('/')) : item.Title;
    }
   }
  }
  return pageId.Substring(pageId.LastIndexOf('/'));
 }
 catch (Exception)
 {
  return pageId.Substring(pageId.LastIndexOf('/'));
 }
 finally
 {
  SPSecurity.CatchAccessDeniedException = originalCatchValue;
 }
}

Wednesday 17 October 2012

Hiding default actions on the ECB (Edit Control Block, or List Item Menu)

My requirement:

Remove the "Modify Permissions" action from the list item menu for lists that have a special content type (used in my solution). Since I need to implement a special application page for modifying list item permissions on the list my solution uses, I've added my own custom action for "Manage Permissions". I don't want to confuse users with two menu items for permissions, nor do I want them using the default "Modify Permissions" action, because it will break my solutions functionality.

While there are a number of ways to do this, most use jQuery and most wait for the ECB to be loaded before they remove the item. I don't particularly like this, because the user will typically see the "Modify Permissions" action for a brief moment before it's removed.

So I decided on a different approach that doesn't rely on jQuery. It uses JavaScript, CSS and leverages an object output by the List View Webpart, ctx, to hide the "Manage Permissions" action using CSS.

The solution elements:


Step 1: Create a user control, and define my JavaScript. The trick here is to limit the time wasted running the script on every page.

To ensure excessive processing isn't performed, the JavaScript will check to see if the ctx object has been defined (indicating the page has an instance of the List View Webpart on it).

If ctx has been defined, the script then checks the ctx.listTemplate property to see if the list instance is based on my solutions custom list template.

If the list template used is the one my solution has deployed, then it writes some CSS to the page to hide the "Manage Permissions" action on the ECB / LIM. The CSS output uses an attribute selector to hide list items with the attribute "sequence" set to 1160 (which is what "Manage Permissions" is set to; you can use Firefox and Firebug to find the sequence number for other controls).

All the user control contains is the following script:

<script type="text/javascript">
ExecuteOrDelayUntilScriptLoaded(editEcbMenusEx, 'Core.js');
function editEcbMenusEx() {
try {
if (typeof ctx == "undefined") {
return;
}
else {
if (ctx.listTemplate == 15501) {
var css = 'li[sequence="1160"]{display:none;}';
var head = document.getElementsByTagName('head')[0];
var style = document.createElement('style');
style.type = 'text/css';
if (style.styleSheet){ style.styleSheet.cssText = css; }
else { style.appendChild(document.createTextNode(css)); }
head.appendChild(style);
}
}
} catch (e) {
}
}
</script>


Step 2: Create a custom action (that gets deployed at the web level when my solution is activated) that loads my control into the AdditionalPageHead place holder of the webs master page.

<?xml version="1.0" encoding="utf-8"?>
<Elements xmlns="http://schemas.microsoft.com/sharepoint/">
  <Control Id="AdditionalPageHead" Sequence="150" 
  ControlSrc="~/_CONTROLTEMPLATES/inceriskregister/RRecbmodifications.ascx">
  </Control>
</Elements>


Step 3. Deploy the solution
[Note: The Manage Permissions action that you see on the LIM is the new custom action that I've defined, which opens my custom manage permissions application page in a modal dialog)


Display multiple nested modal dialogs boxes using a custom action

Adding custom actions to SharePoint's ribbon and context menus is rather cool (I reckon), as well as rather easy! However, while adding an item to the ECB (Edit Control Block) / LIM (List Item Menu) the other day, I was getting an annoying JavaScript issue when closing the dialogs.

Firstly, a little more on what I was doing. From the LIM, I had a menu item that opens an application page in a modal dialog box for creating a new item (it uses a special content type and also creates associated items, hence the special application page). When the user submits the form, the new list items are created, and a second form (the default edit form for the new parent list item) is opened in a new dialog box, allowing the user to enter more information into the fields of a child list item that was created.

So far, so good. When the user clicks Save on the edit form, the form should close (all modal dialogs) and the list (page) should be refreshed to show the new items created.

1. Click on the custom action, which opens the application page in the first modal dialog

2. Enter the new controls (new item) title, and click Save (which creates two new items, a "control item", and an "action item" (which inherits certain field values from the control item), and opens a new dialog containing the default edit page for the new "action item"

3. User fills in the fields for the new "action item" and clicks OK

4. Both modal dialogs should be closed, and the list (parent page) should be refreshed.

The problem was, when the edit form was submitted, the modal dialogs would close ok, but the page wouldn't be refreshed, and instead a JavaScript error was raised.

Message: Function expected
Line: 1139
Char: 13
Code: 0
URI: http://my/_layouts/sp.ui.dialog.debug.js?rev=I4RtkztzINg%2B%2BPCPe%2FeQlw%3D%3D

To cut a long, boring and frustrating story short, this all came down to how I was calling the first modal dialog and forgetting to define the callback function in the custom action.

To get this working correctly, this is what I did;

Put the JavaScript into the URL element of the custom action that will open my application page in a SharePoint modal dialog box (which is where I went wrong initially, forgetting to define the callback function, hence the JavaScript error):

<CustomAction Title="New Control" Id="{1ac99a52-2fdd-4217-b7f4-664011f45251}" 
ImageUrl="/_layouts/images/inceriskregister/document-new32.png" 
Location="EditControlBlock" RegistrationId="0x01007006E66EE8DD45458AEC3EF515A0E6E101" 
RegistrationType="ContentType" Sequence="2" xmlns="http://schemas.microsoft.com/sharepoint/" 
Description="Add a new control for this risk." Rights="AddListItems" >
 <UrlAction Url="javascript:function displayStatus(dialogResult, returnValue) 
 {SP.UI.ModalDialog.RefreshPage(1); SP.UI.ModalDialog.commonModalDialogClose(1,1); }; 
 OpenPopUpPageWithTitle('/_layouts/inceriskregister/newcontrol.aspx?parentId={ItemId}&amp;
 ListId={ListId}&amp;webUrl={SiteUrl}&amp;',displayStatus,null,null,'Add New Control')" 
 />
</CustomAction>


As for my application page, it has the following JavaScript in the page head to handle opening the second modal dialog (after the user has entered a title on the form and clicked Save), and for closing itself:

<script type="text/javascript">
function inceOpenDialog(listEditFormUrl, id, listid) {
ExecuteOrDelayUntilScriptLoaded(function () 
{ intInceOpenDialog(listEditFormUrl, id, listid); }, 'sp.js');}

function intInceOpenDialog(listEditFormUrl, id, listid) {
  try {
   var editForm = listEditFormUrl + '?ID=' + id + '&ListId=' + listid + "";
   var options = {
    url : editForm,
    autoSize : true,
    showClose : true,
    allowMaximize : false,
    dialogReturnValueCallback : displayStatus
   };
   SP.UI.ModalDialog.showModalDialog(options);
  } catch(e) {
   alert(e);
  }
 }

function displayStatus(dialogResult, returnValue) {
  SP.UI.ModalDialog.RefreshPage(1);
  SP.UI.ModalDialog.commonModalDialogClose(dialogResult, returnValue);
 }

function inceCloseModalDialog(refresh) {
  SP.UI.ModalDialog.RefreshPage(1);
  SP.UI.ModalDialog.commonModalDialogClose(dialogResult, returnValue);
 }  
</script>


It always helps if you do thing right the first time. Unfortunately it sometimes takes a few hours of rooting around and getting increasingly frustrated just to find that you've implemented something incorrectly!

No Exact Match Found (SharePoint's PeoplePicker control)

While testing an application page I'd just developed which had a few people picker controls, I noticed that I could select users, SharePoint groups and security groups (as desired), but when I clicked on the validate button, I got the message:

No exact match was found. Click the item(s) that did not resolve for more options.

If I ignored the validation error and clicked Save, the code behind worked fine, and the selected users and groups where process accordingly.


So why was I getting a validation error for groups that exist? Because I was setting the SelectionSet in code during the Page_Load event, the SelectionSet property was being over written when the control was loaded later in the page lifecycle (see: ASP.NET Page Life Cycle Overview)

ppAdmin.SelectionSet = String.Format("{0},{1},{2}", 
PeopleEditor.AccountType.User, 
PeopleEditor.AccountType.SecGroup, 
PeopleEditor.AccountType.SPGroup);

When I added the property to the declaration, presto, it worked properly!

<SharePoint:PeopleEditor runat="server" ID="ppAdmin" 
MultiSelect="True" Height="75" AllowEmpty="False" 
DialogWidth="495" Width="495" AllowTypeIn="True" 
SelectionSet="User,SecGroup,SPGroup" />


Using Multi-valued UserInfo fields (UserMulti)

Call me a dumb arse (maybe I was just tired at the time?!), but I had some issues the other day reading and writing users from a multi-valued UserInfo field.

I had a UserMulti type field declared in my solution, and needed to read and write to it via an application page.

The field declaration:

<Field ID="{084A686D-60CA-4E95-AB4D-55D8B1DF1602}" DisplayName="APTN" Name="ictRiskAPTN" StaticName="ictRiskAPTN" Group="Ince Risk"         List="UserInfo" ShowField="ImnName" Required="FALSE" Type="UserMulti" Description="By default... (omitted)" UserSelectionMode="PeopleOnly" UserSelectionScope="0" AllowMultiVote="TRUE" />

To read from the field:

[Note: Fields.AdditionalPeopleToNotify.Id is a property of a helper class that contains all the Ids, Displaynames and static names of my declared fields)]

var additionalRecipients = i[Fields.AdditionalPeopleToNotify.Id] as SPFieldUserValueCollection;
if (additionalRecipients != null)
{
if (additionalRecipients.Count > 0)
{
foreach (SPFieldUserValue uservalue in additionalRecipients)
{
//Do something with your user
}
}
}

To set the value of the field:

var i = listItems[0];
SPFieldUserValueCollection users = new SPFieldUserValueCollection();
SPPrincipal pr = web.EnsureUser("domain\\username") as SPPrincipal;
users.Add(new SPFieldUserValue(i.Web, pr.ID, pr.Name));
i[Fields.AdditionalPeopleToNotify.Id] = users;
i.SystemUpdate();

Or, for a more realistic example, set the value of the field based on a list of users or groups selected from a PeoplePicker control:

var i = listItems[0];
SPFieldUserValueCollection users = new SPFieldUserValueCollection();
if (peoplePicker.Entities.Count > 0)
{
foreach (PickerEntity entity in peoplePicker.Entities)
{
SPPrincipal pr = null;
if (entity.EntityData.ContainsKey("PrincipalType"))
{
var pT = entity.EntityData["PrincipalType"] as String;
if (pT != null)
{
switch (pT)
{
case "SharePointGroup":
pr = web.SiteGroups[entity.Key] as SPPrincipal;
break;
case "User":
pr = web.EnsureUser(entity.Key) as SPPrincipal;
break;
case "SecurityGroup":
pr = web.EnsureUser(entity.Key) as SPPrincipal;
break;
default:
break;
}
}
}
if (pr != null)
{
users.Add(new SPFieldUserValue(item.Web, pr.ID, pr.Name));
}
}
}
i[Fields.AdditionalPeopleToNotify.Id] = users;
i.SystemUpdate();

Inconsistent CSS styles applied to an email in Outlook when sending email from SharePoint

Recently I was working on a timer job that sends (html) emails via SharePoint's SPUtility.SendEmail function. The CSS styles I used in the email body were being inconsistently applied to the email when viewed in Outlook 2010. The method I was using was:

Create the email body, applying the styles at the top of the email body.
emailBody.Append(AddStyles());
emailBody.Append(body);

Send the email setting the fAppendHtmlTag parameter to true.
SPUtility.SendEmail(web, true, false, recipient, subject, emailBody)

To fix the issue, I set the fAppendHtmlTag parameter to false, instead adding the HTML tags myself, as such:
var body = String.Format("<!DOCTYPE html PUBLIC \"-//W3C//DTD XHTML 1.0 Strict//EN\" \"http://www.w3.org/TR/xhtml1/DTD/xhtml1-strict.dtd\"><html><head><meta http-equiv=\"X-UA-Compatible\" content=\"IE=8\" /><meta http-equiv=\"Content-Type\" content=\"text/html; charset=utf-8\" />{0}</head><body>{1}</body></html>", AddStyles(), emailBody);

Then send the email:
SPUtility.SendEmail(web, false, false, recipient, subject, body)

This worked nicely, and the CSS styles were now applied consistently throughout the body of the email.

Friday 7 September 2012

Profile photos not synchronising from SharePoint to Active Directory

Our scenario: I had setup SharePoint to export users profile photos into Active Directory (thumbnailPhoto attribute). Permissions are set correctly (the initial synchronisation removed all of the current photos in Active Directory and even replaced them with sweet nothing).

There were no errors in the FIIM logs or ULS logs, it just didn't appear to be able to synchronise the photos. The photos were formatted correctly, 96x96 pixels and under 10Kb, so within recommendations, but still not joy.

I thought that photos weren't synchronising across the board, but when I expanded some large distribution lists in Outlook, I noticed that there were a few users with photos that had synchronised. I'd read various posts about pictures not synchronising, including problems people were (are) having trouble with images that had CYMK colour profiles. I compared several of the profile pictures I'd found to be working (synchronising) with those that weren't, but couldn't find any conclusive differences.

Rolling up my sleaves, I decided to break out some PowerShell and start looking at the PictureURL property for a cross section of SharePoint profiles, and I found something interesting. Almost all of the profiles I looked at had '%20' in place of the space character (for the PictureURL property).


Closer investigation revealed that only the SharePoint user profiles without '%20' in the pictureURL property had their picture synchronised into Active Directory (a whole 6 of them).

I did a bit of testing (set one of the IT guys profile pictures to the face of a women), which worked! The picture synchronized! So I then wrote some PowerShell that replaced the '%20' with a space for all the offending user profile properties, and voila, pictures are synchronising into Active Directory!

The PowerShell I used?

Open the SharePoint 2010 management shell and get the User Profile Manager...

[void][reflection.assembly]::Loadwithpartialname("Microsoft.Office.Server") | out-null       
$site=new-object Microsoft.SharePoint.SPSite("https://ca:7443") #Central Admin site          
$servercontext=[Microsoft.Office.Server.ServerContext]::GetContext($site)            
$site.Dispose() # clean up            
$upm = new-object Microsoft.Office.Server.UserProfiles.UserProfileManager($servercontext)

To view the properties:

$pc = $upm.GetEnumerator()            
foreach($p in $pc){$p["PictureUrl"].Value}

To update the properties:

(I also added the port number in and updated any values that were incorrectly referencing the LThumb image (instead of the MThumb image) as advised here: Photo Management in SharePoint 2010)

$pc = $upm.GetEnumerator()            
foreach($p in $pc)            
{            
    $v = $p["PictureUrl"].Value;            
    if($v -ne $null)            
    {            
        if($v.ToString().Contains("%20"))            
        {            
            Write-Host "Need to change value $v";            
            $nv = $v.ToString().Replace("mysite/", "mysite:80/").Replace("%20"," ").Replace("LThumb","MThumb");            
            Write-Host "Writing New Value: $nv" -foregroundcolor green;            
            $p["PictureUrl"].Value = $nv;            
            $p.Commit();            
        }            
    }            
}

Hope it helps someone else too!

Tuesday 14 August 2012

Bulk Updating a Taxonomy Field Value on List Items with PowerShell

It's pretty easy to update the value of a taxonomy field on a collection of list items using PowerShell. Basically, you get a collection of list items, get a reference to the taxonomy field, and then loop through the items, using the SetFieldValue method of the taxonomy field to update the taxonomy field value of each item. Here's how:

1. Get the taxonomy session for the site collection

$ts = Get-SPTaxonomySession -Site http://myweb

2. Get the term store

$tstore = $ts.TermStores[0]

3. Get the term group that contains the termset for the taxonomy field you're updating.
# To list the term group names: $tstore.Groups | FT -AutoSize Name

$tgroup = $tstore.Groups["MyTermGroupName"]

4. Get the termset for the taxonomy field you're updating.
# To list the termsets: $tgroup.TermSets | FT -AutoSize Name
$tset = $tgroup.TermSets["MyTermSetName"]

5. Get the term you want to use to update the list items using the terms ID (or name).
# To list all the terms in the termset: $tset.Terms | FT -AutoSize Name,ID
# Get the term using the term name: $term = $tset.Terms["MyTermName"]

$term = $tset.Terms[[System.Guid]("f5a95261-b9a2-428b-90ce-8f85111dfd55")]

6. Get the SPWeb and List containing the list you want to update

$w = Get-SPWeb http://myweb/subsite
$l = $w.Lists["My List"]

7. Get the first list item, and use it to get a reference to the taxonomy field
$firstItem = $l.Items[0]
$tf = [Microsoft.SharePoint.Taxonomy.TaxonomyField]$firstItem.Fields["MyTaxonomyColumnName"]

8. Loop through the collection of list items and update the value

foreach($i in $l.Items){if($i.Title -like "*Presentation*"){$tf.SetFieldValue($i, $term);$i.Update();Write-host "Updated"$i.Title;}}

You could (and should) write this a little more efficiently, especially if the list is large, by using a query to get your collection of items to loop through (more efficient than looping through the entire list);

$ic = $l | ?{$_.Title -like "*Presentation*"}
foreach($i in $ic){$tf.SetFieldValue($i, $term);$i.Update();Write-host "Updated"$i.Title;}

Thursday 26 July 2012

Adding appointments to an Outlook calendar using EWS (Exchange Web Services) in a Webpart

Recently I had a requirement to create a solution for tracking and scheduling internal events. As part of this, I wanted the solution to add and remove appointments from users Outlook calendars automatically upon registration / cancellation.

Exchange Web Services was the answer.

My approach was:

1. Generate "EWS.dll" (I named mine IEWS.dll)
2. Create a SharePoint solution that registers IEWS.dll as a safe control in the farm and contains an application page for managing my custom Exchange settings (usernames, urls, etc)
3. Create a second solution that contains the webparts, content types, etc, that my solution requires. This solution will have a reference to IEWS.dll, and feature dependency on the first solution.

Step 1.

Everyone seems to refer to EWS.dll on the Internet. The fact is, you need to generate it yourself, and you can call it whatever you like. There's a MSDN blog about it here.

The first step is creating a class file from the Exchange Web Services web service. I used the Microsoft wsdl.exe tool shipped with Visual Studio to do this. All you need to do is specify the language you want to use, the location the class file will be output to, the namespace you want to use (you specify whatever you want this to be) and the URL to an Exchange Web Services server (any of your Exchange servers running the Client Access role).

wsdl.exe /language:cs /out:c:\temp\IEws.cs /namespace:ExchangeWebServices https://myexchangeserver/ews/services.wsdl

Next, we need to compile the class and sign it, using the .Net framework 3.5. There are various ways to do this. What I did was: 

1. Create a new Visual Studio project (I named it IEWS - The "I" in IEWS is the prefix I used to denote our company )

2. Add a new class file to the project (I called mine ExchangeWebServices.cs, to match the class file name I created using the wsdl tool)

3. Delete the contents of the class file

4. Copy the contents of the class file you created with wsdl.exe (c:\temp\IEws.cs) into your new class file


5. Next I added some additional methods to handle my requirements. I added a new class called Extensions, and added my helper methods in there (adding and removing calendar entries, among others). You'll need to add two using statements, one for System.Web.Services, another for the ExchangeWebServices namespace, as well as any others you need, like Microsoft.SharePoint)

One of the my custom (overloaded) methods that adds a calendar appointment to a users mailbox looks like this:

public static Boolean CreateAppointment(string usersEmail, string subject, string description, string location, DateTime startTime, DateTime endTime, Guid appointmentUid, Credentials credentials, String exEwsUrl, out String messages)
{
  StringBuilder output = new StringBuilder();
  try
  {
    ExchangeServiceBinding esb = new ExchangeServiceBinding();
    esb.Credentials = new NetworkCredential(credentials.Username, credentials.Password.ConvertToUnsecureString(), credentials.Domain);
    esb.Url = exEwsUrl;
    esb.RequestServerVersionValue = new RequestServerVersion();
    esb.RequestServerVersionValue.Version = ExchangeVersionType.Exchange2007_SP1;

    //Setup Impersonation
    esb.ExchangeImpersonation = new ExchangeImpersonationType();
    esb.ExchangeImpersonation.ConnectingSID = new ConnectingSIDType();
    esb.ExchangeImpersonation.ConnectingSID.PrimarySmtpAddress = usersEmail;


    // Create the request.
    AddDelegateType request = new AddDelegateType();
    //ToDp: handle the certificate check better.
    ServicePointManager.ServerCertificateValidationCallback = (sender, certificate, chain, sslPolicyErrors) => true;

    // Create the appointment.
    CalendarItemType appointment = new CalendarItemType();

    // Add item properties to the appointment.
    appointment.Body = new BodyType();
    appointment.Body.BodyType1 = BodyTypeType.HTML;
    appointment.Body.Value = CreateHtmlBody(subject, description, location, startTime, endTime);
    appointment.Importance = ImportanceChoicesType.High;
    appointment.ImportanceSpecified = true;
    appointment.ItemClass = "IPM.Appointment";
    appointment.Subject = subject;
    appointment.Location = location;
    appointment.UID = appointmentUid.ToString();
    ExtendedPropertyType[] eProps = CreateAppointmentUidProperty(String.Format("{0}", appointmentUid));
    appointment.ExtendedProperty = eProps;

    // Add calendar properties to the appointment.
    var timeUtc = startTime.ToUniversalTime();
    var endTimeUtrc = endTime.ToUniversalTime();
    appointment.Start = timeUtc;
    appointment.StartSpecified = true;
    appointment.End = endTimeUtrc;
    appointment.EndSpecified = true;
    appointment.ReminderMinutesBeforeStart = "30";
    appointment.ReminderIsSet = true;

    
    // Identify the destination folder that will contain the appointment.
    var folder = new DistinguishedFolderIdType();
    folder.Id = DistinguishedFolderIdNameType.calendar;
    
    // Create the array of items that will contain the appointment.
    var arrayOfItems = new NonEmptyArrayOfAllItemsType();
    arrayOfItems.Items = new ItemType[1];

    // Add the appointment to the array of items.
    arrayOfItems.Items[0] = appointment;

    // Create the CreateItem request.
    CreateItemType createItemRequest = new CreateItemType();

    // The SendMeetingInvitations attribute is required for calendar items.
    createItemRequest.SendMeetingInvitations = CalendarItemCreateOrDeleteOperationType.SendToNone;
    createItemRequest.SendMeetingInvitationsSpecified = true;

    // Add the destination folder to the CreateItem request.
    createItemRequest.SavedItemFolderId = new TargetFolderIdType();
    createItemRequest.SavedItemFolderId.Item = folder;

    // Add the items to the CreateItem request.
    createItemRequest.Items = arrayOfItems;

    // Send the request and get the response.
    CreateItemResponseType createItemResponse = esb.CreateItem(createItemRequest);

    ArrayOfResponseMessagesType responseMessages = createItemResponse.ResponseMessages;
    ResponseMessageType findResponseType = responseMessages.Items[0];
    if (findResponseType.ResponseClass != ResponseClassType.Success)
    {
      output.Append(String.Format("Failed to create item. Response Class: {0}. Response Messages: {1}", findResponseType.ResponseClass, findResponseType.MessageText));
      return false;
    }

    // Get the response messages.
    ResponseMessageType[] rmta = createItemResponse.ResponseMessages.Items;
    output.Append(String.Format("<div>An appointment has been added to your calendar.</div>"));
    output.Append(String.Format("<div>Repsonse:</div>"));
    foreach (ResponseMessageType rmt in rmta)
    {
      ArrayOfRealItemsType itemArray = ((ItemInfoResponseMessageType)rmt).Items;
      ItemType[] items = itemArray.Items;
      // Get the item identifier and change key for each item.
      foreach (ItemType item in items)
      {
        output.Append(String.Format("<div>Item identifier: {0}</div>", item.ItemId.Id));
        output.Append(String.Format("<div>Item change key: {0}</div>", item.ItemId.ChangeKey));
      }
    }
    return true;
  }
  catch (Exception e)
  {
    output.Append(e.Message);
    return false;
  }
  finally
  {
    messages = output.ToString();
  }
}

private static ExtendedPropertyType[] CreateAppointmentUidProperty(String value)
{
  PathToExtendedFieldType pathToAppointmentUid = new PathToExtendedFieldType();
  pathToAppointmentUid.DistinguishedPropertySetId = DistinguishedPropertySetType.PublicStrings;
  pathToAppointmentUid.DistinguishedPropertySetIdSpecified = true;
  pathToAppointmentUid.PropertyName = CalendarTrackingUidName;
  pathToAppointmentUid.PropertyType = MapiPropertyTypeType.String;

  ExtendedPropertyType appointmentPropertyUid = new ExtendedPropertyType();
  appointmentPropertyUid.ExtendedFieldURI = pathToAppointmentUid;
  appointmentPropertyUid.Item = value;

  ExtendedPropertyType[] eProps = new ExtendedPropertyType[1];
  eProps[0] = appointmentPropertyUid;
  return eProps;
} 

6. Once all the extension methods are finished, the next step is to sign the project and build it. This will, among other things, compile the code as IEWS.dll, which I can now use in my next project.

Step 2.

1. The next step I took, was creating a new empty SharePoint project (in the same solution). This project will be responsible for deploying the IEWS.dll to the SharePoint farm (so that other solutions can use it), and will install an application page I can use to configure settings the extension methods I created will need (usernames, passwords, URLs, etc).

To have the solution deploy IEWS.dll as an additional assembly when the solution is deployed;

1. Open the Package manager
2. Click on Advanced


3. Click Add > Add Assembly from Project Output...
4. For the Source Project, I selected the first project I created, IEWS, which contains the Exchange Web Services class and the extension class I created in Step 1.


5. Under the safe controls section, click on Click here to add new item
6. Add the ExchangeWebServices namespace


7. Click OK.
8. Build the solution and deploy it.

Step 3 - Make use of the Exchange Web Services in a webpart.

This is the easy bit!

1. Create a new solution, and add an empty SharePoint project

2. Add a reference to IEWS.dll created in the previous solution (note that this dll doesn't need to be packaged with this solution - the first solution is responsible for deploying it to your SharePoint servers)

3. Add a webpart to the project
4. Add all the controls you need to the webpart. Obviously this will depend on what you're doing. Mine looks like this;

4a. The webpart displays a list of available events a user can register for.

4b. When the user selects an event to register for, an application page is displayed in the SharePoint dialog framework to allow the user to register themselves or select someone else they are registering on behalf of.


5. When the user clicks Register, code adds the event to the specified users calendar using methods in my IEWS. The code in the application page looks a bit like this (I've slimmed it down to essentials)

using System;
using System.Collections;
using System.Web.UI;
using System.Web.UI.WebControls;
using Microsoft.SharePoint;
using Microsoft.SharePoint.Taxonomy;
using Microsoft.SharePoint.Utilities;
using Microsoft.SharePoint.WebControls;
using IEWS;

namespace Ince.Events.Layouts.Ince.Events
{

public partial class bookevent : LayoutsPageBase
{
private Guid _listId;
private Guid _webId;
private int _itemId;

protected void Page_Load(object sender, EventArgs e){...}        

private void PopulateFields(Guid webid, Guid listid, int itemid){...}        

protected void SubmitClick(Object sender, EventArgs e)
{
try
{
(code to get page arguments)
SPSecurity.RunWithElevatedPrivileges(delegate()
{
using(SPSite site = new SPSite(SPContext.Current.Site.Url))
{
site.AllowUnsafeUpdates = true;

using (SPWeb web = site.OpenWeb(webid))
{
try
{
web.AllowUnsafeUpdates = true;

(code omitted that gets the events list, gets the selected event, checks if there are available spaces, adds the selected user as an attendee and updates the list item)                                                                

//Add the event to the selected users mailbox
if (IEWS.ExchangeServices.CreateAppointment(usersemailaddress, item["Title"].ToString(), description.ToString(), locationAsText.ToString(), startDate, endDate, item.UniqueId))
{
eventConfirmationMessage.Text = String.Format("<div>You've been registered for this event, and we've added an appointment to your Outlook calendar to help remind you.</div>");
}
else
{
eventConfirmationMessage.Text = String.Format("<div>You've been registered for this event, but we failed to add an appointment to your Outlook calendar. Please make a note of the time and date, and optionally manually add the appointment to your Outlook calendar.</div>");
}
(code omitted that handles exceptions, etc)
...
}
6. Deploy the solution.

Creating new terms in a taxonomy store using PowerShell

Ever wondered how to create new terms in a taxonomy set using PowerShell? It's super easy.

Get the Taxonomy Session for your site
$ts = Get-SPTaxonomySession -Site http://myweb/
$tstore = $ts.TermStores[0]

List the term groups (if you don't know the name)
$tstore.Groups | ft name

Get the term group
$tgroup = $tstore.Groups["AdministrativeTermsets"]

List the term sets if you don' t know the name
$tgroup.TermSets | FT Name

Get the termset
$eTypeTS = $tgroup.TermSets["EventType"]

Create a new term (the CreateTerm method can be call with just two parameters, the name and locale id, if you're happy for SharePoint to automatically generate a Guid for the terms ID).
$eTypeTS.CreateTerm("Seminar", 1033, [System.Guid]("9A4B69D1-D359-4152-B9F6-34357C769711"))

When you're finished creating terms, update the termgroup to commit the changes.
$tgroup.TermStore.CommitAll()

Tuesday 17 July 2012

Adding Taxonomy Fields to Content Types in Visual Studio

Recently I created some content types in Visual Studio to be packaged and deployed as part of a wider solution. I thought I'd document how I went about it, in case you're interested.

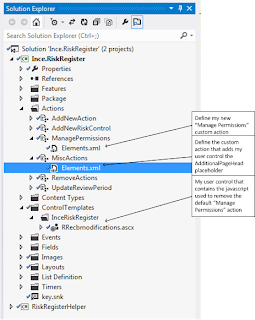
My solution (actually two solutions) consists of a base solution that contains all of the field definitions, and a second solution (dependant on the first) that contains the content types, list definitions, views, etc.

To create the first solution, containing the fields that will be used in the new content types:

1. Create a new Empty SharePoint project in Visual Studio

2. Add a new Empty Element to the project

3. Next, add all the field definitions that you intent to use. For my project, I added several taxonomy (managed metadata) fields, as well as a few other various fields. I keep to a couple of rules when adding fields;

Rule 1. Name all my custom fields with a prefix that identifies our organisation (in my case, this "ict")
Rule 2. Always specify the Group attribute, to logically group my fields

4.To add the taxonomy field, you need to create two field definitions, a taxonomy field, and a text field. The example below highlights the attributes I'm setting (note that I've set the FillInChoice attribute to true, to allow terms to be added to the termset via the new / edit list forms in the browser).

<?xml version="1.0" encoding="utf-8"?>
<Elements xmlns="http://schemas.microsoft.com/sharepoint/">
 <Field ID="{58BFD5B7-808E-4C39-ABD1-5EF402F419A9}"  
DisplayName="_Technology" Name="ictTechnology0" 
StaticName="ictTechnology0" Group="Ince Managed Fields" 
Type="Note" ShowInViewForms="FALSE" Required="FALSE" 
Hidden="TRUE" CanToggleHidden="TRUE" RowOrdinal="0" />
 <Field ID="{C3BC216A-10E6-4A52-A875-B368BF663297}" 
DisplayName="Technology" Name="ictTechnology" 
StaticName="ictTechnology" Group="Ince Managed Fields" 
Type="TaxonomyFieldType" ShowField="Term1033" FillInChoice="TRUE"/>
</Elements> 


5. Once the fields have been added, I use an feature receiver to do the rest (associate the taxonomy field to a Term Set, and associate the text field to the taxonomy field. I've seen blogs where people do this declaratively, but I prefer the feature receiver - then I can check if the termset exists, create it if it doesn't, and optionally create default terms.

The code in my feature receiver (I've scoped my feature to the Site level) looks a little like this, performing the following functions; Check the termgroup exists (create it if it doesn't), check the termset exists (create it if it doesn't), configure the fields.

Note. Make sure you add a reference to Microsoft.SharePoint.Taxonomy


public override void FeatureActivated(SPFeatureReceiverProperties properties)
{
try
{
SPDiagnosticsService.Local.WriteTrace(0, new SPDiagnosticsCategory("Ince.BaseFields", TraceSeverity.Medium, EventSeverity.Information), TraceSeverity.Medium, String.Format("[FeatureActivation] Activating Ince Base Fields."), null);
using (SPSite site = properties.Feature.Parent as SPSite)
{
if (site == null)
{SPDiagnosticsService.Local.WriteTrace(0, new SPDiagnosticsCategory("Ince.BaseFields", TraceSeverity.Unexpected, EventSeverity.ErrorCritical), TraceSeverity.Unexpected, String.Format("[FeatureActivation] Could not get a reference to the site. Aborting."), String.Empty);
return;}

TaxonomySession session = new TaxonomySession(site);
SPDiagnosticsService.Local.WriteTrace(0, new SPDiagnosticsCategory("Ince.BaseFields", TraceSeverity.Medium, EventSeverity.Information), TraceSeverity.Medium, String.Format("[FeatureActivation] Taxonomy Session: {0}", session), null);
if (session.TermStores.Count != 0)
{
var termStore = session.TermStores[0];
SPDiagnosticsService.Local.WriteTrace(0, new SPDiagnosticsCategory("Ince.BaseFields", TraceSeverity.Medium, EventSeverity.Information), TraceSeverity.Medium, String.Format("[FeatureActivation] Term Store: {0}", termStore.Name), null);

//Get the Term Group, creating it if it doesn't already exist
var group = GetTermGroup(termStore, "InceFunctional");
SPDiagnosticsService.Local.WriteTrace(0, new SPDiagnosticsCategory("Ince.BaseFields", TraceSeverity.Medium, EventSeverity.Information), TraceSeverity.Medium, String.Format("[FeatureActivation] Group: {0}", group.Name), null);

//Get the Term Set, creating it if it doesn't already exist
TermSet technologyTermSet = GetTermSet(group, "Technology", new Guid("{B71B29C9-4FBA-4FEE-9D77-77EF84C43ED2}"));
SPDiagnosticsService.Local.WriteTrace(0, new SPDiagnosticsCategory("Ince.BaseFields", TraceSeverity.Medium, EventSeverity.Information), TraceSeverity.Medium, String.Format("[FeatureActivation] Term Set: {0}", technologyTermSet.Name), null);

Guid fieldId = new Guid("{C3BC216A-10E6-4A52-A875-B368BF663297}"); //Technology field.
if (site.RootWeb.Fields.Contains(fieldId))
{
TaxonomyField taxonomyField = site.RootWeb.Fields[fieldId] as TaxonomyField;
if (taxonomyField == null)
{
SPDiagnosticsService.Local.WriteTrace(0, new SPDiagnosticsCategory("Ince.BaseFields", TraceSeverity.Medium, EventSeverity.Information), TraceSeverity.Medium, String.Format("[FeatureActivation] Taxonomy Field is null for field id: {0}.", fieldId), null);
return;
}
SPDiagnosticsService.Local.WriteTrace(0, new SPDiagnosticsCategory("Ince.BaseFields", TraceSeverity.Medium, EventSeverity.Information), TraceSeverity.Medium, String.Format("[FeatureActivation] Setting Taxonomy Field settings for field: {0}.", fieldId), null);

//Associate the taxonomy field to the termset.
taxonomyField.SspId = technologyTermSet.TermStore.Id;
taxonomyField.AnchorId = Guid.Empty;
taxonomyField.TermSetId = technologyTermSet.Id;
taxonomyField.AllowMultipleValues = true;

//Configure the taxonomy field to allow terms to be added via the form
taxonomyField.CreateValuesInEditForm = true;
//Associate the text field to the taxonomy field.
taxonomyField.TextField = new Guid("{58BFD5B7-808E-4C39-ABD1-5EF402F419A9}");
taxonomyField.Update();
}}}}
catch (Exception e)
{
SPDiagnosticsService.Local.WriteTrace(0, new SPDiagnosticsCategory("Ince.BaseFields", TraceSeverity.Unexpected, EventSeverity.ErrorCritical), TraceSeverity.Unexpected, String.Format("[FeatureActivation] Unexpected error activating Ince Base Fields solution. Error: {0}", e.Message), e.StackTrace);
}}

private static TermSet GetTermSet(Group group, String termsetName, Guid termsetId)
{
try
{
foreach (TermSet set in group.TermSets)
{
if (set.Name.ToLower().Equals(termsetName.ToLower()))
{return set;}
}
SPDiagnosticsService.Local.WriteTrace(0, new SPDiagnosticsCategory("Ince.BaseFields", TraceSeverity.Medium, EventSeverity.Information), TraceSeverity.Medium, String.Format("[FeatureActivation] Termset does not exist. Creating Termset. "), null);
var termSet = group.CreateTermSet(termsetName, termsetId, 1033);
group.TermStore.CommitAll();
return termSet;
}
catch (Exception e)
{
SPDiagnosticsService.Local.WriteTrace(0, new SPDiagnosticsCategory("Ince.BaseFields", TraceSeverity.Unexpected, EventSeverity.ErrorCritical), TraceSeverity.Unexpected, String.Format("[FeatureActivation] Unexpected error activating ITContentTypes solution. Error: {0}", e.Message), e.StackTrace);
throw new Exception("[GetTermSet] Exception getting term set.");
}}

private static Group GetTermGroup(TermStore store, string groupName)
{
try
{
foreach (Group g in store.Groups)
{
if (g.Name.ToLower().Equals(groupName.ToLower()))
{
return g;
}}
SPDiagnosticsService.Local.WriteTrace(0, new SPDiagnosticsCategory("Ince.BaseFields", TraceSeverity.Medium, EventSeverity.Information), TraceSeverity.Medium, String.Format("[FeatureActivation] Group does not exist. Creating Group. "), null);
store.CreateGroup(groupName);
store.CommitAll();
return store.Groups[groupName];
}
catch (Exception)
{
throw new Exception("[GetTermGroup] Exception getting term store group.");
}}


6. Build and package the solution, then deploy it.

7. The next step is creating a content type that uses the taxonomy field. To do this I've created a new Empty SharePoint Project, and added a new Content Type to the project. I've based mine on an Item.

8. Open the Elements.xml file created for the content type, and add field references to (among others) your new taxonomy fields.

<?xml version="1.0" encoding="utf-8"?>
<Elements xmlns="http://schemas.microsoft.com/sharepoint/">
<!-- Parent ContentType: Item (0x01) -->
<ContentType ID="0x0100d8cf45e3ef6a4044a6b9dea877e4617f"
   Name="IT Item"
   Group="Ince"
   Description="A list for tracking IT ideas or issues."
   Inherits="TRUE"
   Version="0">
<FieldRefs>
  <FieldRef ID="{fa564e0f-0c70-4ab9-b863-0177e6ddd247}" 
  DisplayName="Title"/>
  <FieldRef ID="{C6F3AEEB-1ADE-43CB-81BA-828D38E23D78}" 
  DisplayName="_Project" Name="ictProjectName0"/>
  <FieldRef ID="{75335227-12FD-4376-935F-30C2A57B1AB5}" 
  DisplayName="Project" Name="ictProjectName" Required="FALSE" />
  <FieldRef ID="{58BFD5B7-808E-4C39-ABD1-5EF402F419A9}" 
  DisplayName="_Technology" Name="ictTechnology0"/>
  <FieldRef ID="{C3BC216A-10E6-4A52-A875-B368BF663297}" 
  DisplayName="Technology" Name="ictTechnology" Required="FALSE" />
  <FieldRef ID="{53101f38-dd2e-458c-b245-0c236cc13d1a}" 
  DisplayName="Assigned To" />
  <FieldRef ID="{9da97a8a-1da5-4a77-98d3-4bc10456e700}" 
  DisplayName="Description" NumLines="10"/>
  <FieldRef ID="{c15b34c3-ce7d-490a-b133-3f4de8801b76}" 
  DisplayName="Status"/>
</FieldRefs>
</ContentType>
</Elements> 


9. Bobs your uncle (that means it's finished - deploy it and away you go!). Some other things you might want to consider; adding an activation depency on the first solution, and adding some list definitions to your solution that use the content type.

Thursday 28 June 2012

SharePoint Server Search error 2587

After our SharePoint and SQL servers were patched over the weekend, (I'm laying the blame here), SharePoint Server started logged warning event 2587, which looks like this:

The following conditions are currently affecting index propagation to this server for search service application 'SharePoint-Live-Search':
1. Query 1, catalog Main: unresponsive for 104 minutes. not completing tasks
2. Query 1, catalog Anchor: unresponsive for 104 minutes. not completing tasks
3. Query 1 is not being automatically disabled because the minimum number of ready query components per partition is 2.

Using some deep dive research techniques I learnt during recon missions in world war two, I tapped the error code into Google and came across this firm called Microsoft, who have a command to fix this issue. The crux of it is below, but to see the full article, go here.
As well as this error event, my crawls were not completing.

The Restart-SPEnterpriseSearchQueryComponent cmdlet recovers a failed query component from its redundant component under the same index partition. There must be redundant query components (at least two) serving one index partition, one of which being in Ready state.
If this query component is offline because of some failures —for example, index corruption, low disk, or out-of- sync — a user can recover this component by running this cmdlet.
 

To restart a query component;

1. Take note of the query component name (mine was "Query 1", seen in the event)
2. Open a PowerShell window
3. Run the following commands;

$ess = Get-SPEnterpriseSearchServiceApplication
$qt = $ess.QueryTopologies
$qc = Get-SPEnterpriseSearchQueryComponent -QueryTopology $qt.ActiveTopology 

## List out the query components. Note that in Microsofts example the state of one of their query components is "failed". Both of my query components where in the ready state, even though one was clearly broken. From the error message above, you can see that SharePoint was not automatically disabling it because "the minimum number of ready query components per partition is 2."
$qc  | ft name,state

Name                                         State
1641af7b-62eb-4fff-898d-f08be5086dc7-query-2 Ready
1641af7b-62eb-4fff-898d-f08be5086dc7-query-1 Ready


## Choose the query you need to restart and pipe it the restart commandlet.

 $qc[1]  | Restart-SPEnterpriseSearchQueryComponent 
This will get the query component rebuilding, which may take a while. Problem solved.

Thursday 10 May 2012

Quick Analytics from SharePoint (kind of...)

SharePoints builtin analytics, interesting as they are, don't always provide you with what you need.

This week I had a request to provide a report that summarised access to a particular pdf document on a SharePoint site (accessed via a URL in an email), broken down by department, location and employee type. At first I thought I'd design a simple SharePoint solution that allowed site admins to upload a file to a library, then track the access to the document via an application page that provided a dynamic graph where they could slide and dice the information.

As cool as that would have been, since I was short on time, and this was a one off request, I decided to use Log Parser and PowerShell to create the report (which took a fraction of the time).

Here's what I did:

1. Copy the IIS log files (for the SharePoint web application in question) from the WFE servers into a single directory on my computer

2. Open PowerShell, change to the directory with the log files, run logparser against the files, and extract the data I want into a CSV file.

Obviously this is where you would customise Log Parser to output the data you're interested in, but the command I ran pulls out the number of times a user has opened the document (DocumentInQuestion.pdf) per day.

Here's the command:

logparser.exe -i:W3C "select cs-username as User, Count(*) as ReadCount, date into report.csv from .\* where cs-uri-stem = '/marketing/documents/DocumentInQuestion.pdf' and User Is Not Null and date > Timestamp('2012-04-01','yyyy-MM-dd') group by user,date" -o:CSV

3. Next, the fun bit, is using PowerShell to bring it all together. What I'm going to do is create an object to store each record in, then add the records to an array, and use the array to create the report.... Oh, and I'm going to use the Active Directory PowerShell module so that I can get some extra data about each user from Active Directory (department, office location and employee type).

First. create the object for storing each record in:

$request = New-Object psobject
$request | Add-Member -MemberType NoteProperty -Name "Name" -value ""
$request | Add-Member -MemberType NoteProperty -Name "Location" -value ""
$request | Add-Member -MemberType NoteProperty -Name "Department" -value ""
$request | Add-Member -MemberType NoteProperty -Name "EmployeeType" -value ""
$request | Add-Member -MemberType NoteProperty -Name "Reads" -value ""
Copy the data from the CSV file to a PowerShell object we can use:

$r  = Import-Csv .\report.csv

$r now contains each line of the CSV file (as a collection of objects), and we can access individual columns by their original name in the CSV file. I.e. $r[0].user

Next, create a new array, loop through each object in $r (aka each line of the imported CSV file), format the 'user' column (I need to trim of the domain name), passing the 'user' string to the Get-AdUser command (returning a user object containing the extra properties (displayName, Office and employeeType) I need), parse the object returned from Active Directory, extracting the contents into a new "request" object and merge it with the details from the current object in $r, and finally add it to the array. Phew... that was a long sentence, but really quite straight forward.

To break it down a little;

1. For each object (aka line of the CSV file) in $r
foreach($i in $r)

2. Getting the "user" property, trimming off the first 6 characters (which is our domain name and forward slash)
$i.User.Substring(6)

3. Pass the trimmed user name to the Get-AdUser commandlet, and request the additional properties, displayName, department, office and employeeType
$u = get-aduser $i.User.Substring(6) -Properties displayName,department,office,employeeType 

4. If the object returned from Active Directory is not empty, then create a new "request" object, and populate it with information from the current object in $r (aka current line in the CSV file), and add it to the array
if($u -ne ""){
$b = $request | Select-Object *; $b.Name = $u.displayName; $b.Location = $u.office; $b.Department = $u.department; $b.EmployeeType = $u.employeeType; $b.Reads = $i.ReadCount; $a += $b;
;}

Here's the full command:

$a = $null
$a = @()
foreach($i in $r){$u="";$u = get-aduser $i.User.Substring(6) -Properties displayName,department,office,employeeType -ErrorAction:SilentlyContinue; if($u -ne ""){
$b = $request | Select-Object *; $b.Name = $u.displayName; $b.Location = $u.office; $b.Department = $u.department; $b.EmployeeType = $u.employeeType; $b.Reads = $i.ReadCount; $a += $b;
;}}

Once we have done this, we have all the information we need in a new array of objects, and it's simply a case of formatting the data the way we want it and creating the report. Because we have an array of "request" objects, this is pretty easy, as we can iterate over them, group them, sort them, etc. I needed to display the following information:

Total amount of people who opened the document
Total amount of people by Office
Total Partners
Total Fee Earners
Total Business Services

My report looked like this:

$nr = @();
$nr += "Usage for: "+$doc
$nr += ""
$nr += "Total Count: "+$a.Count
$nr += ""
$nr += "Count per office:"
$b = $a | group location; foreach($d in $b){$nr += $d.Count.ToString()+"`t"+$d.Name}
$nr += ""
$nr += "Total Partners"
$b = $a | ?{$_.Department -like "Partners"} | measure; foreach($d in $b){$nr += $d.Count.ToString()+"`t"+$d.Name}
$nr += ""
$nr += "Partners / Office"
$b = $a | ?{$_.Department -like "Partners"} | group location; foreach($d in $b){$nr += $d.Count.ToString()+"`t"+$d.Name}
$nr += ""
$nr += "Total Support Staff"
$b = $a | ?{$_.EmployeeType -like "SupportStaff"} | measure; foreach($d in $b){$nr += $d.Count.ToString()+"`t"+$d.Name}
$nr += ""
$nr += "Support Staff / Office"
$b = $a | ?{$_.EmployeeType -like "SupportStaff"} | group location; foreach($d in $b){$nr += $d.Count.ToString()+"`t"+$d.Name}
$nr += ""
$nr += "Total Fee Earning Staff"
$b = $a | ?{$_.EmployeeType -like "FeeEarningStaff"} | measure; foreach($d in $b){$nr += $d.Count.ToString()+"`t"+$d.Name}
$nr += ""
$nr += "Fee Earning Staff / Office"
$b = $a | ?{$_.EmployeeType -like "FeeEarningStaff"} | group location; foreach($d in $b){$nr += $d.Count.ToString()+"`t"+$d.Name}

And when displayed, it looks like this...

Usage for: /marketing/documents/DocumentInQuestion.pdf

Total Count: 477

Count per office:
52      Hong Kong
42      Hamburg
8        Monaco
191    London
12      Le Havre
19      Paris
33      Dubai
36      Greece
29      Singapore
33      Shanghai
20      Singapore Local
2        Beijing

Total Partners
92

Partners / Office
58      London
1        Hamburg
5        Singapore
11      Greece
2        Shanghai
8        Dubai
3        Singapore Local
4        Paris

Total Support Staff
195

Support Staff / Office
23      Hong Kong
35      Hamburg
58      London
12      Le Havre
15      Paris
11      Greece
7        Dubai
15      Singapore Local
5        Shanghai
13      Singapore
1        Beijing

Total Fee Earning Staff
269

Fee Earning Staff / Office
6         Monaco
7         Hamburg
133     London
26       Dubai
29       Hong Kong
15       Greece
21       Singapore
28       Shanghai
4         Paris

Tuesday 6 March 2012

Extending the SharePoint Search Box (SearchBoxEx) webpart

I've just finished extending SharePoints Search Box (SearchBoxEx) webpart. I had requirements for three different search boxes (wildcarding the people search, adding a custom properties drop down box for advanced searching and adding an extra button for an optional people search).

The process for all three was largely the same. The method below outlines how I created the multi-button search box, embedded in our master page and looks like this:


The basic steps are;
1. Create a new webpart project and inherit from the SearchBoxEx class
2. Add an ImageButton that calls a (client side) javascript function
3. Copy, rename and modify the javascipt function that the oob webpart calls
4. Create the webpart.dwp file
5. Deploy the solution

This is what I did;
1. Create a new Empty SharePoint project
2. Add a reference to Microsoft.SharePoint.Portal
3. Add a new webpart to the project
4. In the webparts class file, adding the using statement and inherit the SearchBoxEx (Search Box webpart) class (See MSDN for more information)

using ...
using Microsoft.SharePoint.WebControls;

namespace Ince.SearchParts.MultiMiniSearchBox{
[ToolboxItemAttribute(false)]
public class MultiMiniSearchBox : Microsoft.SharePoint.Portal.WebControls.SearchBoxEx
{
...
} 

5. Add the ImageButton and initialise it.

private ImageButton _peopleSearch;
protected override void OnInit(EventArgs e)
{
base.OnInit(e);
_peopleSearch = new ImageButton();
_peopleSearch.ID = "peopleMiniSearch";
_peopleSearch.EnableViewState = false;
_peopleSearch.CausesValidation = false;
_peopleSearch.ImageUrl = "/_layouts/images/ince/isqdepartment.png";
_peopleSearch.Height = new Unit(19, UnitType.Pixel);
_peopleSearch.CssClass = "isqPeopleSearchImg";
} 

6. Add two properties for the results pages (the search results page and the people search results page).

private string _peopleResultsUri = String.Empty;
[WebBrowsable(true), WebDisplayName("People Results Url"), Personalizable(PersonalizationScope.Shared), Category("Webpart Settings")]
public String PeopleResultsUri
{
get { return _peopleResultsUri; }
set { _peopleResultsUri = value; }
}

private string _searchResultsUri = String.Empty;
[WebBrowsable(true), WebDisplayName("Search Results Url"), Personalizable(PersonalizationScope.Shared), Category("Webpart Settings")]
public String SearchResultsUri
{
get { return _searchResultsUri; }
set { _searchResultsUri = value; }
} 

7. Add code to the CreateChildControls method to set the search results url properties.

Because I'm primarly using this webpart in the master page (and unable to set the properties from the toolpart pane), I'm looking for the results page URL in two locations. The first is the webparts properties (settable via the toolpart pane). If this is empty, then I'm checking the root webs property bag for the URL.

I'm also configuring the other settings for the webpart, like the scope, CSS, chrome, etc.

protected override void CreateChildControls()
{
base.CreateChildControls();
EnsureChildControls();
String peopleResultsUrl = this.SearchResultPageURL;
String searchResultsUrl = this.SearchResultPageURL;
try
{
var rootWeb = SPContext.Current.Site.RootWeb;
if (PeopleResultsUri != String.Empty)
{
peopleResultsUrl = PeopleResultsUri;
}
else
{
if (rootWeb.Properties.ContainsKey("inceIsqPeopleResultsUri"))
{
peopleResultsUrl = rootWeb.Properties["inceIsqPeopleResultsUri"];
}
}
if (SearchResultsUri != String.Empty)
{
searchResultsUrl = SearchResultsUri;
}
else
{
if (rootWeb.Properties.ContainsKey("inceIsqSearchResultsUri"))
{
searchResultsUrl = rootWeb.Properties["inceIsqSearchResultsUri"];
}
}
}
catch (Exception exception)
{
SPDiagnosticsService.Local.WriteTrace(0, HighCategory(), TraceSeverity.High, 
String.Format("[CreateChildControls] Unhandled Exception getting results page urls. Error: {0}", 
    exception.Message), "");
}
_peopleSearch.Style.Clear();
_peopleSearch.OnClientClick = String.Format("javascript:isqPeopleSearch('{0}', '{1}');return;", 
    m_searchKeyWordTextBox.ClientID, peopleResultsUrl);
Controls.Add(_peopleSearch);
this.UseSiteDropDownMode = false;
this.SearchResultPageURL = searchResultsUrl;
this.AdvancedSearchPageURL = searchResultsUrl;
this.ChromeType = PartChromeType.None;
this.GoImageActiveUrl = this.GoImageUrl;
this.CssClass = "isqSearchBoxExOveride";
this.DropDownMode = DropDownModes.HideScopeDD;
this.DropDownModeEx = DropDownModesEx.HideScopeDD;
this.QueryPromptString = String.Empty;
} 

8. Attach the CSS and JavaScript

protected override void OnLoad(EventArgs e)
{
base.OnLoad(e);
CssRegistration.Register("/_layouts/styles/ince/ince-searchparts.css?v2");
ClientScriptManager cs = Page.ClientScript;
if (!cs.IsStartupScriptRegistered("incesearchparts"))
{
cs.RegisterStartupScript(this.GetType(), "incesearchparts", 
    "<script type='text/javascript\' src='/_layouts/incejs/ince-searchparts.js?v2'></Script>");
cs.RegisterClientScriptInclude(this.GetType(), 
    "incesearchparts", "/_layouts/incejs/ince-searchparts.js?v2");
}
} 

9. Add the JavaScript function

The OOB search button calls a JavaScript function, which in turn calls the GoSearch(...) found in search.js

I pulled this function apart and copied out the bits I needed, then modified it to do what I needed (which was simply to wildcard the keyword if the people search button was clicked). This is what I ended up with:

function isqPeopleSearch(keywordElement, resultsPage)
{
var i = document.forms[0].elements[keywordElement].value;
i = i.replace(/\s*$/, "");
var b = "?s=People";
if (i == "")
{
alert("Please enter one or more search words.");
if (null != event) {
event.returnValue = false; return false
}
else
return;
}
b += "&k="+i+"*";
window.location = resultsPage + b;
try {
if (null != event)
event.returnValue = false
}
catch (s) {
}
return
} 

10. Create the dwp file.

Before deploying the solution and adding the webpart, you'll need to create a .dwp webpart description file, and modify the elements.xml file.

10.1 Elements XML

Open the elements.xml file, and change the extension of the webpart file from .webpart to .dwp. My elements.xml file now looks like this:

<?xml version="1.0" encoding="utf-8"?>
<Elements xmlns="http://schemas.microsoft.com/sharepoint/" >
<Module Name="MultiMiniSearchBox" List="113" Url="_catalogs/wp">
<File Path="MultiMiniSearchBox\MultiMiniSearchBox.dwp" 
    Url="MultiMiniSearchBox.dwp" Type="GhostableInLibrary">
<Property Name="Group" Value="Ince Search" />
</File>
</Module>
</Elements> 

10.2 Create the dwp file

Right click the webpart and select Add. Add new XML file, giving it the same file name used in the elements.xml file (i.e. MultiMiniSearchBox.dwp)

Now add all the webpart properties to the xml file (make sure you get the Assembly and TypeName correct). There's other documentation and blogs on how to do this, but my slimmed down version was:

<?xml version="1.0" encoding="utf-8"?>
<WebPart xmlns:xsi="http://www.w3.org/2001/XMLSchema-instance" 
    xmlns:xsd="http://www.w3.org/2001/XMLSchema" 
    xmlns="http://schemas.microsoft.com/WebPart/v2">
<Title>Multi Min Search Box</Title>
<FrameType>None</FrameType>
<Description>Displays a search box that allows users to search for information or people.</Description>
<IsIncluded>true</IsIncluded>
<IsVisible>true</IsVisible>
<HelpMode>Modeless</HelpMode>
<Dir>Default</Dir>
<MissingAssembly>Cannot import this Web Part.</MissingAssembly>
<Assembly>Ince.SearchParts, Version=1.0.0.0, Culture=neutral, PublicKeyToken=e69a99a27d408090</Assembly>
<TypeName>Ince.SearchParts.MultiMiniSearchBox.MultiMiniSearchBox</TypeName>
<ShouldTakeFocusIfEmpty xmlns="urn:schemas-microsoft-com:SearchBoxEx">true</ShouldTakeFocusIfEmpty>
</WebPart> 

10.3 Change the Deployment Type for the new .dwp file

Click the new .dwp file in Solution Explorer, and view the properties. Change the Deployment Type to ElementFile.

10.4 Delete the old .webpart file

11. Deploy the solution

Friday 24 February 2012

Displaying a DOM element using the SharePoint Dialog framework.

I have a webpart that is rendering information about people, including some extended information in a hidden div. The idea is, when the user clicks on the text "About me", extended information about the person (in the hidden div) is display using the SP.UI.ModalDialog framework.

I've used the SP.UI.ModalDialog framework a lot, and using it to display an application page, or a HTML string is easy. But what about sending it a DOM element that's been looked up within a script? In the MSDN documentation, the description of the html property of the options object is "A string that contains the HTML of the page that appears in the dialog." (SP.UI.ModalDialog.showModalDialog(options) Method). Nothing about sending a DOM element though.

It turns out (well, from the testing I did) that you can pass a DOM element into the html property. When you invoke the (javascript) function that opens the dialog, it all works fine, and the dialog window opens and displays the contents of the div... the first time anyway. The second time you call the function, you get a script error when trying to get a reference to the element.

It seems the element gets removed from the document object model after the first time the dialog is is used to display it (something I'm yet to understand why). To get around this, all I needed to do was clone the element, and pass the clone to the html property. Here's the function I used:

function imDisplayElementInPopup(elementId, title){
 //get the hidden element
 var wbalert = document.getElementById(elementId);
 //clone the element
 var wbalertClone = wbalert.cloneNode(true);
 ExecuteOrDelayUntilScriptLoaded(function () {
  //set the options
  var options = SP.UI.$create_DialogOptions();
  options.title = title;
  options.width = 270;
  //pass the cloned element into the html property
  options.html = wbalertClone;
  SP.UI.ModalDialog.showModalDialog(options);
 }, "sp.js");
}